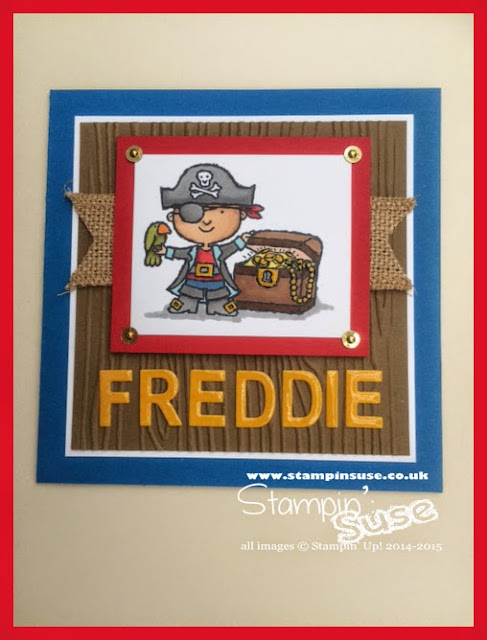
… the boy being 'FREDDIE'!
Freddie is mum's neighbour, an uber-cute little chap who turned 3 yesterday!
Here's the card I made for mum to give him, I purposefully left off his age so that it can be framed to go in his room after the big day.
* WARNING - The Stamp Set Featured is only available until June 2nd, 2015 : 'Hey, Valentine' (138570 clear mount)
Here's how I made it…
- 'Pacific Point' Cardstock cut to 11' x 5-1/2", scored at 5-1/2" for square card base.
- 'Whisper White' Cardstock cut make 2, 4-3/4" squares and 1 2-1/2"x3" panel. Adhere one of the 4-3/4" straight to the front of the card, keeping margins equal. I used Tombow for this.
- I cut a 4-1/2" square from 'Soft Suede' card stock and embossed it with the 'Woodgrain' TIEF with the Bigshot, again, I adhered that to the Whisper White on the card front with Tombow.
- From 'Crushed Curry' Card stock I die cut the letters for his name using the 'Little Letters Thinlit Dies' and the big shot with the 'Magnetic Platform'. Adhering them to the Woodgrain panel with Tombow - always use a ruler to line them up - much easier, and neater!
- With 'Pacific Point' Ink I stamped the Happy Birthday Sentiment from 'Sassy Salutations Stamp set into the centre of the other 4-3/4" Whisper white square and glued it inside the card, for the insert panel.
- With 'Momento' ink I stamped the Pirate from the 'Hey, Valentine Stamp set (I had already cut away the valentine sentiment as I also did on the fishes, I loved the images and wanted to use them for children's cards through the year) Being sad that the Blendabilities have been discontinued, I went back to my trusty Promarkers to colour in the pirate and his treasure chest (I spent years colouring and teaching with these pens before my SU! days)
- Once my pirate image was dry I matted it onto a 3'x3-1/2" piece of 'Real Red' card stock at each corner of my image I placed a single sequin from a reel of 'Gold Sequin Trim' and pierced a hole for a 'Mini Brad' to go through - as these come in silver I'd used my Promarkers to colour them gold.
- Using 'Fast Fuse' I adhered a 5" strip of 'Burlap Ribbon' across the back of my matted pirate image. I trimmed each end of the burlap to an inverted 'V'. With 'Dimensionals' at each corner of the topper, I placed it firmly onto the woodgrain layer.
- For a final touch I used 'Crystal Effects' to create a glossy, lacquered look on the letters of FREDDIE and on the gold buckles and coins of the treasure chest.
Oooh Ar, me hearties!!


Love this fabulous image,a beautiful card.xxx
ReplyDeleteLove the image and a fab design.xxx
ReplyDelete