Sunday, 17 May 2015

All About The Boy...

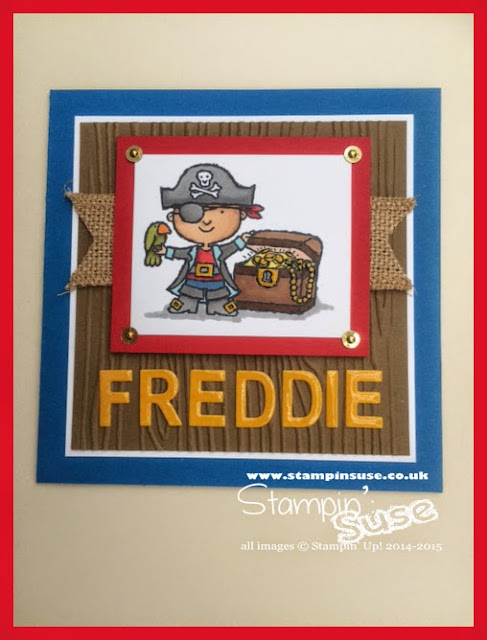
… the boy being 'FREDDIE'!

Freddie is mum's neighbour, an uber-cute little chap who turned 3 yesterday!
Here's the card I made for mum to give him, I purposefully left off his age so that it can be framed to go in his room after the big day.

* WARNING - The Stamp Set Featured is only available until June 2nd, 2015 :  'Hey, Valentine' (138570 clear mount)


Here's how I made it…

  • 'Pacific Point' Cardstock cut to 11' x 5-1/2", scored at 5-1/2" for square card base.
  • 'Whisper White' Cardstock cut make 2, 4-3/4" squares and 1 2-1/2"x3" panel.  Adhere one of the 4-3/4" straight to the front of the card, keeping margins equal. I used Tombow for this.
  • I cut a 4-1/2" square from 'Soft Suede' card stock and embossed it with the 'Woodgrain' TIEF with the Bigshot, again, I adhered that to the Whisper White on the card front with Tombow.
  • From 'Crushed Curry' Card stock I die cut the letters for his name using the 'Little Letters Thinlit Dies' and the big shot with the 'Magnetic Platform'.  Adhering them to the Woodgrain panel with Tombow - always use a ruler to line them up - much easier, and neater!
  • With 'Pacific Point' Ink I stamped the Happy Birthday Sentiment from 'Sassy Salutations Stamp set into the centre of the other 4-3/4" Whisper white square and glued it inside the card, for the insert panel.
  • With 'Momento' ink I stamped the Pirate from the 'Hey, Valentine Stamp set (I had already cut away the valentine sentiment as I also did on the fishes, I loved the images and wanted to use them for children's cards through the year)  Being sad that the Blendabilities have been discontinued, I went back to my trusty Promarkers to colour in the pirate and his treasure chest (I spent years colouring and teaching with these pens before my SU! days)  
  • Once my pirate image was dry I matted it onto a 3'x3-1/2" piece of 'Real Red' card stock at each corner of my image I placed a single sequin from a reel of 'Gold Sequin Trim' and pierced a hole for a 'Mini Brad' to go through - as these come in silver I'd used my Promarkers to colour them gold.
  • Using 'Fast Fuse' I adhered a 5" strip of 'Burlap Ribbon' across the back of my matted pirate image.  I trimmed each end of the burlap to an inverted 'V'.  With 'Dimensionals' at each corner of the topper, I placed it firmly onto the woodgrain layer.
  • For a final touch I used 'Crystal Effects' to create a glossy, lacquered look on the letters of FREDDIE and on the gold buckles and coins of the treasure chest.  
Oooh Ar, me hearties!!


Friday, 15 May 2015

Better Get Better Butterfly - Get Well Card

*SNEAK PEEK ALERT*
When my friends sister was taken into hospital this week, she called on me for a card to cheer her up…
 eager to use the NEW IN-COLOURS that landed on my doorstep just the day before, here it is - What do you think?


The 'TIP TOP TAUPE' and 'MINT MACARON' make a beautiful trio with the 'VERY VANILLA'


Here's how I made it…
  • Cut A4 'Tip Top Taupe' down to 11" x 5-1/2", then score at 5-1/2" to make square card base.
  • Cut another piece of 'Tip Top Taupe' to a 5" square and gut (cut out the centre square, leaving a 'frame' approx. 3/4"/2cm - this way you don't waste card stock in matting layering, you keep the centre pieces for later use!)
  • From 'Very Vanilla' card stock you will need a 5-1/4"square, gutted to make a 'frame' and 2, 4-3/4" squares left whole, finally 1 strip 1/2"x 3-1/4".
  • With 'Multipurpose adhesive - Tombow' adhere the 'Very Vanilla' frame onto the front of the card blank, keeping margins equal. On top of that, adhere the 5" 'Tip Top Taupe' frame.  Apply 'Dimensionals' to the card blank at the inside corners of the taupe frame, and in the centre, to await the top, stamped, layer.
  • From 'Mint Macaron' cardstock cut a strip 3/4" x 3-1/4" and trim the left edge to an inverted 'V', also, die cut the mid sized Butterfly from the Butterflies Thinlits Dies, curl gently with a bone folder to give 'life' to the wings. Lay butterfly on Silicone sheet, cover with glue stick and coat in Dazzling Diamonds Glitter. Set aside.
  • Using 'Tip Top Taupe' Ink and the 'Butterfly Basics' stamp set, stamp fern image across bottom of 4-3/4" square of 'Very Vanilla' (remember to 'stamp-off' onto scrap to create the varying shades of the fern colour)  Also stamp the bottom left corner of the other 4-3/4" 'Very Vanilla' piece, for the insert panel.  With the same colour ink, at full strength, stamp the sentiment from 'A Dozen Thoughts' stamp set onto the 3/4" strip of 'Very Vanilla, trim the sentiment strip on the left side to an inverted 'V'.
  • With 'Mint Macaron' Ink stamp, 'stamped-off' butterflies onto the card front panel and top left of the insert panel. Once the insert panel is dry adhere to inside of card with Tombow.
  • Cut a 3" piece of 'Tip Top Taupe Dotted Lace Trim', trim the left edge to an inverted 'V'.  With Fast Fuse adhere the right edge of the trim to the rear of the 'Mint Macaron' banner at an angle (as photo of card) and where the sentiment banner to the top, again at an angle.  Attach the whole sentiment banner embellishment to the top right of the stamped front panel.
  • Attach the front panel to the front of the card using the previously placed 'dimensionals'  Then with Tombow glue the 'body' of the Dazzling Butterfly, allowing the wings to 'fly'.  
  • Finally, thread some 'Linen Thread' through the holes of a'Very Vintage Designer Button', tie in a bow and stick onto the right side of the sentiment banner with some 'Glue Dots® '

Actually…. NOT FINALLY… as with the NEW 'Envelope Paper' in 2015-17 In-Colours' I also went ahead and made a co-ordinating envelope, using the 'Envelope Punch Board' adding a finishing touch of stamping them 'fern' onto the front also!


Caroline is collecting it shortly, I hope it's to her liking!
Now i've to make another card for mum's neighbour, Freddie… he's going to be 3….mmmm now what to use…


Wednesday, 13 May 2015

Weekly Deal Day!

Yes, it's Wednesday yet again, 
which means we have brand NEW...

… The Coaster Board, 2-1/2" Circle punch and the Arrows TIEF have just made their way into my basket, along with some 'My Digital Studio' bits! 

Don't miss out - if you are an MDS user, as SU! is discontinuing this product line, ALL MDS downloads are reduced - so get your hands on some digital bargains while you can.
(Once it's downloaded onto your computer, you have it for LIFE - irrelevant of SU! discontinuing it)

Please continue to support me by including the HOSTESS CODE on your order - unless your order is over £150 - in which case YOU get the Hostess Credits!!


Saturday, 9 May 2015

90th Birthday!

My Aunty Nancy, baker of such fabulous biscuits - we named them after her - and one of the most stylist ladies EVER, has reached the marvellous age of 90, and my mum asked me to make a card from us… what do you think?


I used :
Memorable Moments Stamp Set - 126682 retiring -£18.66
Brushed Silver Cardstock - 124918 retiring - sold out :(
Shimmery White Cardstock - 121717
Fancy Foil Designer Vellum - Silver - 133364
Organza/Satin Ribbon - Whisper White - 114319
VersaMark - 102283
Stamp-a-ma-jig - 101049
Petite Petal Punch - 133322
Stampin' Trimmer - 129722
Rhinestone Basic Jewels - 119246
Stampin' Emboss Powder - 109132
Embossing Buddy® - 103083
Heat Tool - (UK plug) 129054
Big Shot - 113439
Labels Collection Framelits - 125598 retiring - sold out :(
Stampin' Dimensionals - 104430
SNAIL Adhesive - 104332
Glue Dots® - 103683

How I Made It...
1.  Using the Stampin' Trimmer, cut Brushed Silver card to 10 x 5", score at 5", making a 5" square card blank.
2.  Cut Shimmery White Cardstock to 4-3/4" Square, adhere to inside as insert panel.
3.  Cut Fancy Foil Vellum to 4-3/4" Square, adhere to front of card, using SNAIL just behind the dots, so the adhesive doesn't show through.
4.  Take a length of the Organza/Satin ribbon and tie over the card front securing in a bow at the top left corner, trim tails.
5.  Using the Big Shot cut the No.2 label frame lit (No.1 being the smallest) from the Brushed Silver card and then cut No.3 from the shimmery white card.
6.  Working on some scrap paper, wipe over the surface of the silver No.2 label with the embossing buddy.  Stamp the messages in VersaMark Ink using the Stamp-a-ma-jig for perfect placement.  Cover with the White embossing powder, tap off the excess and return to the pot. Heat set the message with the heat tool, until the powder has melted and turned a bright white.  Set aside to cool.  Once cooled, mat on top of the white No.3 label with dimensionals and adhere the white label to the front of the card with further dimensionals.
7.  With the Petite Petals punch, punch 3 vellum flowers, curl gently with your fingers, or the butt end of the piercing tool and the foam mat. Place a rhinestone in the centre of each flower.  with a glue dot on the back of each flower place them in a cluster at the bottom right of the sentiment label on the card - done!
***

With the Brushed silver card retiring, you may wish to try this card using Smokey Slate as the base card?   and as Memorable Moments Stamp Set retiring, you can either catch it if you're quick at the great reduced price of £18.66 - 126682, or, hang fire until 3rd June when the NEW Annual Catalogue is launched - you're sure to find some equally lovely stamp sets in there!

This card would also be great for Weddings, Engagements, Silver Anniversaries even Christenings with a simple change of sentiment!

Enjoy! - any comments would be gratefully received!


Friday, 8 May 2015

WEEKLY DEALS - available until 12th May!

While you might be busy perusing the list of 
you may also want to check out the current 
WEEKLY DEALS …

THIS month is definitely the time to grab some amazing bargains and tick off a few items on that 'wish-list' before they leave for good, and with up to 50% off some items are selling out fast!

Remember both the 2014-15 ANNUAL CATALOGUE AND
the 2015 SPRING/SUMMER CATALOGUE finish on 
TUESDAY 2nd JUNE 2015
(The Annual catalogue is finishing earlier than the printed catalogue states)

If anyone needs help ordering please call or e-mail me directly
0777 6234012 or stampinsuse@hotmail.com

Happy Shopping